
前言
当前分析的Rollup版本:2.63.0
经过Rollup源码分析(一)、(二)篇幅的学习,大家对 Rollup 基础都有一定的了解。是否对 Rollup 插件想要更深入的了解呢?比如一个插件究竟怎么写出来的,一个插件的编写思路是怎样的。今天就让我带大家来学习一下,如何编写一个 Rollup 插件。
常用插件功能
对 Rollup插件编写需要对插件各个环节的钩子有所了解,才能比较好的实现插件。但是如果一上来就看钩子介绍源码,大家肯定受不了,看不下去,很难理论和实际结合去思考。所以我们先去了解下常用的插件功能是什么,怎么实现的。
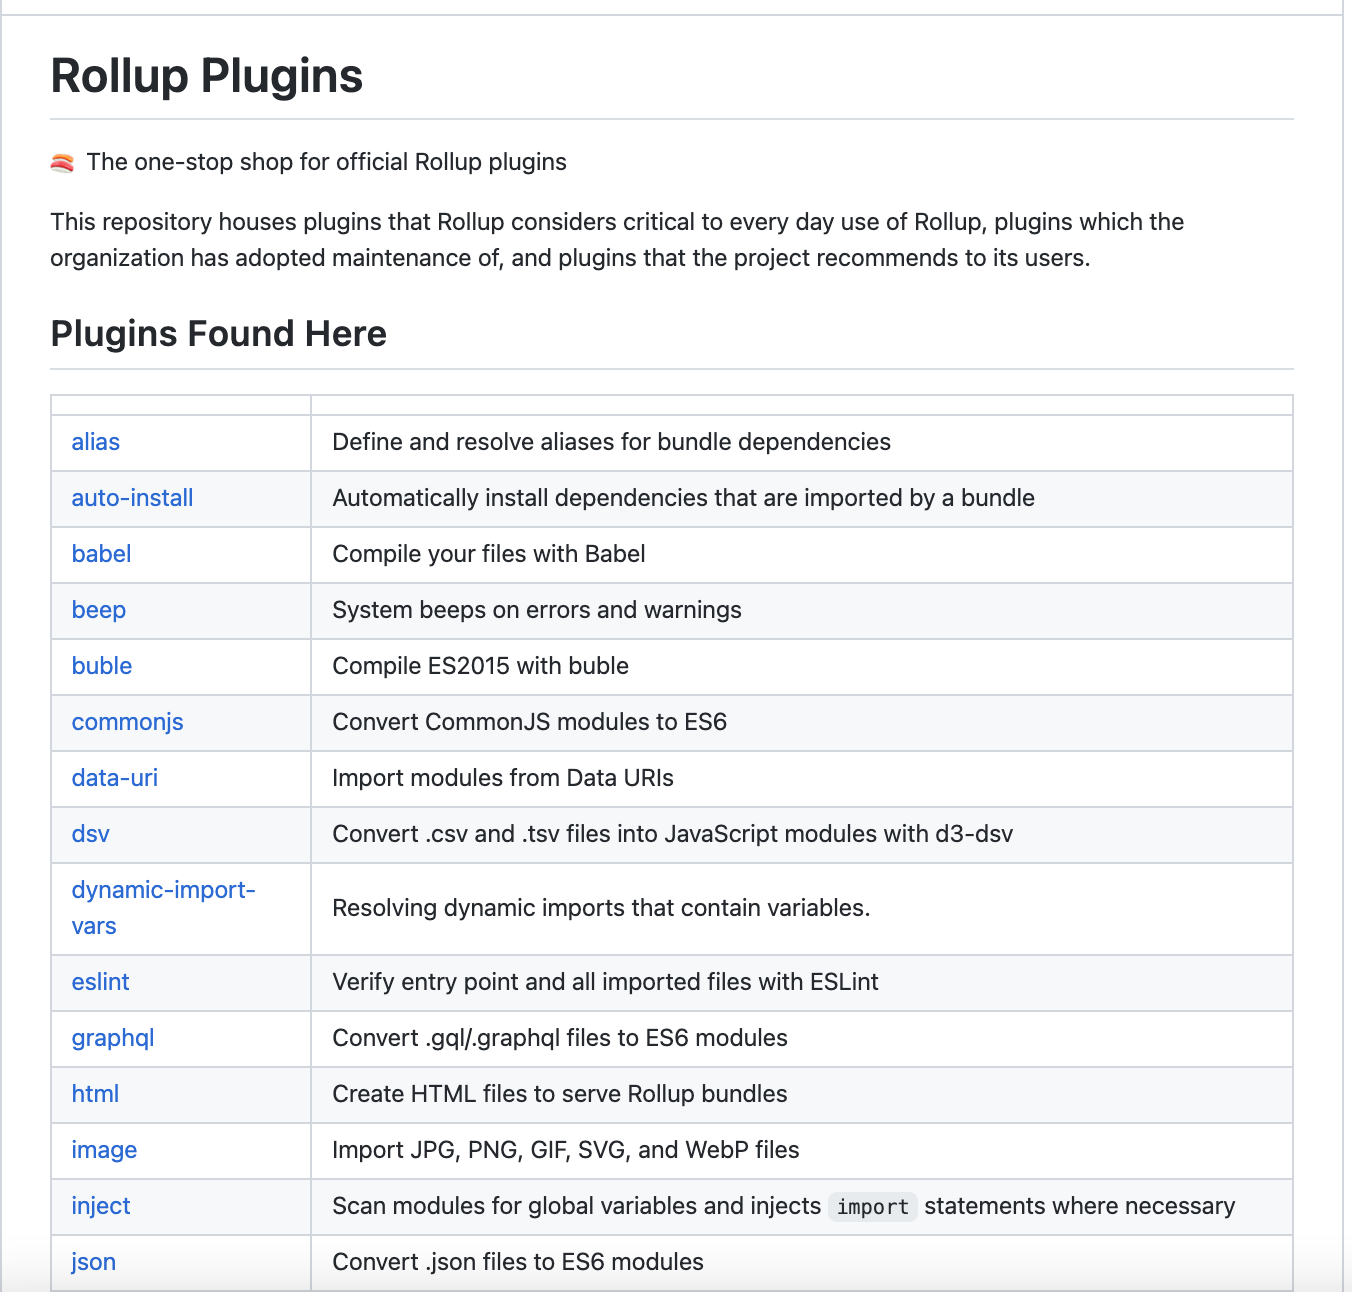
让我们看看官方插件列表: The one-stop shop for official Rollup plugins
url 插件
代码仓库地址:https://github.com/rollup/plugins/tree/master/packages/url
用途:用base64 编码数据或者ES module的方式导入文件 (Import files as data-URIs or ES Modules)
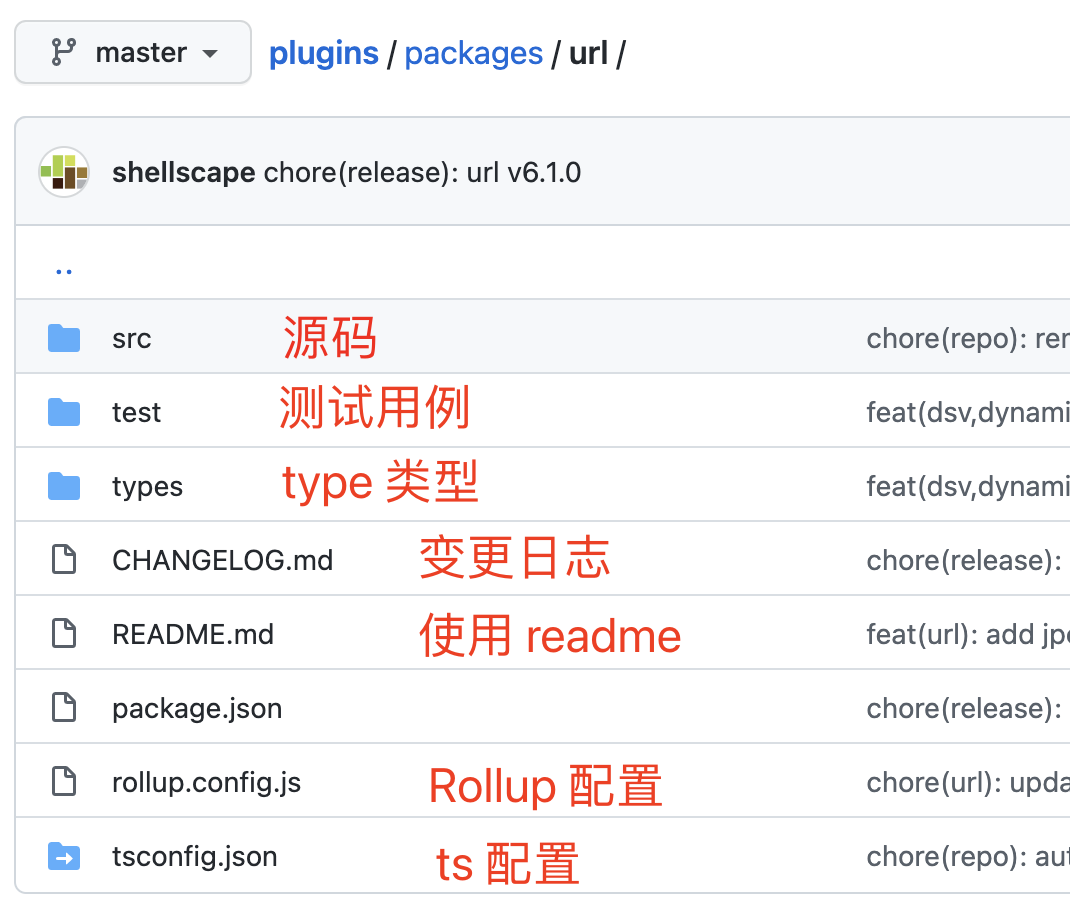
先看下**目录结构**,目录结构还比较整齐的。包含 readme、变更日志、类型、测试用例、源码
后面我们自己去写一个插件也应该包含这些文件,才比较符合规范。
再看下源码,分 2 个钩子处理
load: 加载钩子,在文件加载的时候判断先判断是否符合,不符合退出,符合则进行下一步。符合大小限制则用 data-uri 的方式内联文件,不是的话则返回ESmodule 的方式导入
generateBundle 阶段: 生成 Bundle 触发的钩子,主要对文件的一个 copy 处理,移动到 publicPath 目录下
这样看就比较清晰了,这个插件运用了 2 个钩子就能够达到对 文件 url 的处理。
// ...
const defaultInclude = ['**/*.svg', '**/*.png', '**/*.jp(e)?g', '**/*.gif', '**/*.webp'];

export default function url(options = {}) {
  const {
    limit = 14 * 1024,
    include = defaultInclude,
    exclude,
    publicPath = '',
    emitFiles = true,
    fileName = '[hash][extname]'
  } = options;
  const filter = createFilter(include, exclude);

  const copies = Object.create(null);

  return {
    name: 'url',
    // 加载文件钩子事件
    load(id) {
      if (!filter(id)) {
        return null;
      }
      return Promise.all([fsStatPromise(id), fsReadFilePromise(id)]).then(([stats, buffer]) => {
        let data;
        // 如果文件大小限制大于 limit 或者limit 为0
        // 采用 copy 的方式处理
        if ((limit && stats.size > limit) || limit === 0) {
          const hash = crypto.createHash('sha1').update(buffer).digest('hex').substr(0, 16);
          const ext = path.extname(id);
          const name = path.basename(id, ext);
          // Determine the directory name of the file based
          // on either the relative path provided in options,
          // or the parent directory
          const relativeDir = options.sourceDir
            ? path.relative(options.sourceDir, path.dirname(id))
            : path.dirname(id).split(sep).pop();

          // Generate the output file name based on some string
          // replacement parameters
          const outputFileName = fileName
            .replace(/\[hash\]/g, hash)
            .replace(/\[extname\]/g, ext)
            // use `sep` for windows environments
            .replace(/\[dirname\]/g, relativeDir === '' ? '' : `${relativeDir}${sep}`)
            .replace(/\[name\]/g, name);
          // Windows fix - exports must be in unix format
          data = `${publicPath}${outputFileName.split(sep).join(posix.sep)}`;
          copies[id] = outputFileName;
        } else {
          // 匹配不同格式的文件
          // 如果是 svg 用 svg 的格式处理
          // 如果是其他图片则用 base64 转化
          const mimetype = mime.getType(id);
          const isSVG = mimetype === 'image/svg+xml';
          data = isSVG ? encodeSVG(buffer) : buffer.toString('base64');
          const encoding = isSVG ? '' : ';base64';
          data = `data:${mimetype}${encoding},${data}`;
        }
        // 导出文件
        return `export default "${data}"`;
      });
    },
    generateBundle: async function write(outputOptions) {
      // Allow skipping saving files for server side builds.
      if (!emitFiles) return;

      const base = options.destDir || outputOptions.dir || path.dirname(outputOptions.file);

      await makeDir(base);

      await Promise.all(
        Object.keys(copies).map(async (name) => {
          const output = copies[name];
          // Create a nested directory if the fileName pattern contains
          // a directory structure
          const outputDirectory = path.join(base, path.dirname(output));
          await makeDir(outputDirectory);
          return copy(name, path.join(base, output));
        })
      );
    }
  };
}

// 文件拷贝
function copy(src, dest) {
  // ...
}

// svg 转uri数据格式
// https://github.com/filamentgroup/directory-encoder/blob/master/lib/svg-uri-encoder.js
function encodeSVG(buffer) {
  return (
    encodeURIComponent(
      // ..
  );
}
json
官方插件目录结构都一致,就不讲目录结构了,直接看 json 插件是干嘛的。
插件描述:A Rollup plugin which Converts .json files to ES6 modules. (转化 json 文件为 ES6 modules)
import { createFilter, dataToEsm } from '@rollup/pluginutils';

export default function json(options = {}) {
  const filter = createFilter(options.include, options.exclude);
  const indent = 'indent' in options ? options.indent : '\t';

  return {
    name: 'json',

    // eslint-disable-next-line no-shadow
    transform(json, id) {
      // transform 钩子中执行匹配如果不是 JSON 则跳过
      if (id.slice(-5) !== '.json' || !filter(id)) return null;
			// try catch 方式处理 json 文件格式异常
      try {
        const parsed = JSON.parse(json);
        // 将 json 数据直接转化成 es6 module,Rollup 打包用的过程数据格式 code
        return {
          code: dataToEsm(parsed, {
            preferConst: options.preferConst,
            compact: options.compact,
            namedExports: options.namedExports,
            indent
          }),
          map: { mappings: '' }
        };
      } catch (err) {
        const message = 'Could not parse JSON file';
        const position = parseInt(/[\d]/.exec(err.message)[0], 10);
        this.warn({ message, id, position });
        return null;
      }
    }
  };
}
Yaml
这个是对 Yaml 文件进行读取处理,也是一种比较常用的插件
也是利用 transform钩子在针对 Yaml 类型的文件做解析后转化成为 js 能够识别的 module。
import YAML from 'js-yaml';
import toSource from 'tosource';
import { createFilter, makeLegalIdentifier } from '@rollup/pluginutils';

const defaults = {
  documentMode: 'single',
  safe: true,
  transform: null
};
const ext = /\.ya?ml$/;

export default function yaml(opts = {}) {
  const options = Object.assign({}, defaults, opts);
  const { documentMode, safe } = options;
  const filter = createFilter(options.include, options.exclude);
  let loadMethod = null;

  if (documentMode === 'single') {
    loadMethod = safe ? YAML.load : YAML.safeLoad;
  } else if (documentMode === 'multi') {
    loadMethod = safe ? YAML.loadAll : YAML.safeLoadAll;
  } else {
    this.error(
      `plugin-yaml → documentMode: '${documentMode}' is not a valid value. Please choose 'single' or 'multi'`
    );
  }

  return {
    name: 'yaml',
		// transform 钩子
    transform(content, id) {
      // 文件后缀检测
      if (!ext.test(id)) return null;
      // 过滤函数检测
      if (!filter(id)) return null;
			// js-yaml 库对 yaml 文件进行处理
      let data = loadMethod(content);

      if (typeof options.transform === 'function') {
        const result = options.transform(data, id);
        // eslint-disable-next-line no-undefined
        if (result !== undefined) {
          data = result;
        }
      }

      const keys = Object.keys(data).filter((key) => key === makeLegalIdentifier(key));
      const code = `var data = ${toSource(data)};\n\n`;
      const exports = ['export default data;']
        .concat(keys.map((key) => `export var ${key} = data.${key};`))
        .join('\n');

      return {
        code: code + exports,
        map: { mappings: '' }
      };
    }
  };
}
总结一下:以上三个插件总共用了 load、generateBundle、transform 三钩子。在文件转化方面是用了 transform 这个在转换环节有点类似 webpack 中的 loader 的效果,做模块的转换。在文件加载过程特异化的处理,则用 load 钩子,修改文件导入的方式与方法,generateBundle 则是在 bundle.generate() 后,在bundle.write()前触发。简单来说就是生成文件前做的一些处理。
看generateBundle钩子官方的描述
Called at the end of
bundle.generate()or immediately before the files are written inbundle.write(). To modify the files after they have been written, use thewriteBundlehook.bundleprovides the full list of files being written or generated along with their details:
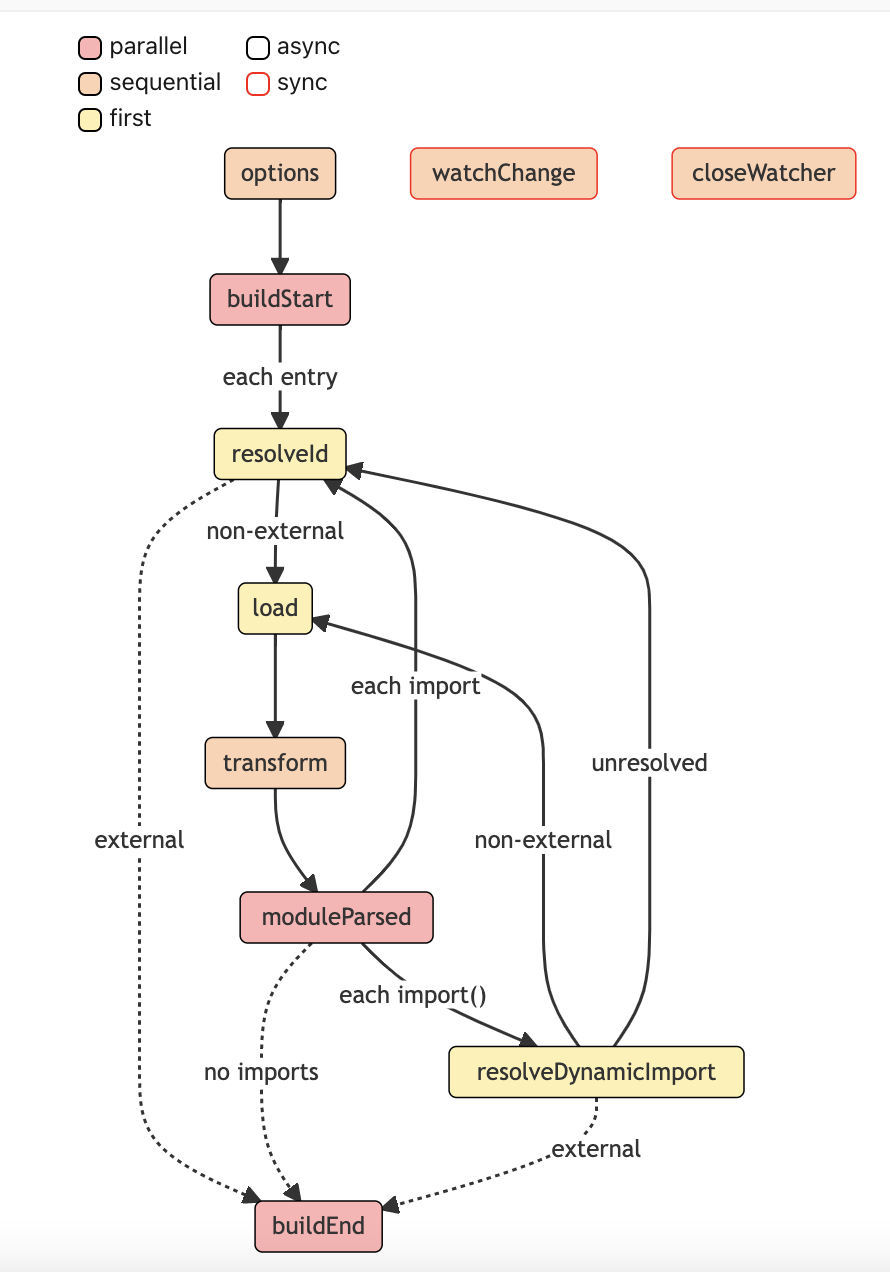
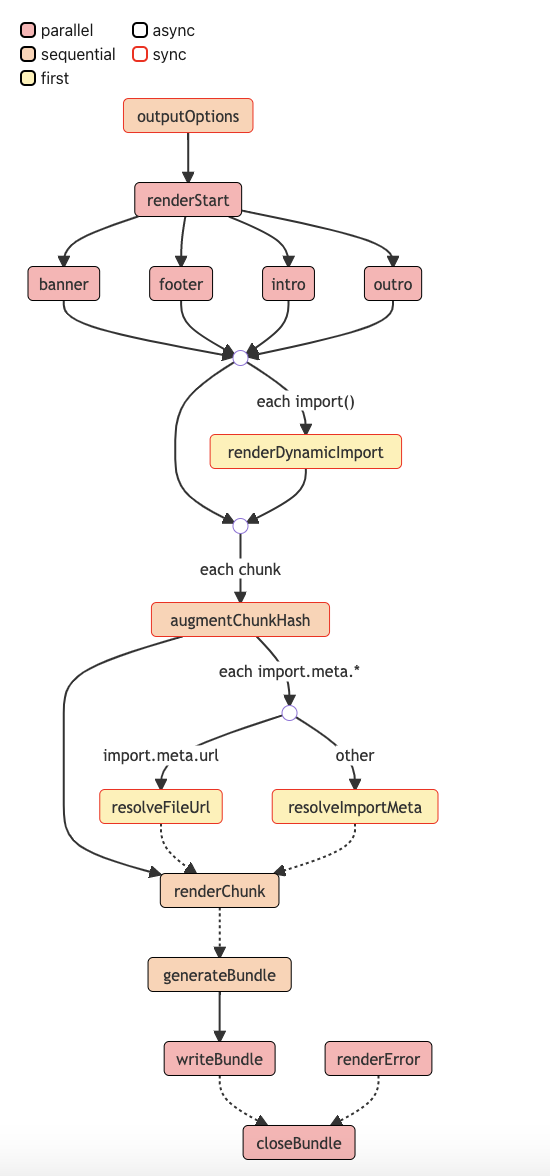
钩子流程图
了解了几个钩子,让我们知道可以通过插件在打包的环节中插手做自己想做的事情。接下来我们将看官方的 2 张钩子流程图
第一个:构建流程的钩子函数与它所处于的位置
第二个图:**输出流程 **各个钩子所在的位置
钩子类型
钩子类型不外乎这 4 种
async: The hook may also return a promise resolving to the same type of value; otherwise, the hook is marked assync.(同步、异步函数)first: If several plugins implement this hook, the hooks are run sequentially until a hook returns a value other thannullorundefined.(frist 类型的话,使用相同的钩子,最先执行成功返回后面的钩子不执行)sequential: If several plugins implement this hook, all of them will be run in the specified plugin order. If a hook is async, subsequent hooks of this kind will wait until the current hook is resolved.( 如果多个插件实现了相同的钩子函数,那么会串式执行,按照使用插件的顺序从头到尾执行,如果是异步的,会等待之前处理完毕,在执行下一个插件。)parallel: If several plugins implement this hook, all of them will be run in the specified plugin order. If a hook is async, subsequent hooks of this kind will be run in parallel and not wait for the current hook.(同上,不过如果某个插件是异步的,其后的插件不会等待,而是并行执行,这个也就是我们在 rollup.rollup() 阶段看到的处理方式。)
仔细看图里的标注: 分别对几种类型有颜色区分,对同步和异步的钩子有边框颜色的区分,让读者更好能够在图上就识别这个钩子的类型特征。
通过源码里的 d.ts我们也能够快速分分辨出来钩子类型,我这边也总结一下不同类型的钩子有哪些
FirstPluginHooks
export type FirstPluginHooks =
	| 'load' // 加载
	| 'renderDynamicImport'
	| 'resolveAssetUrl' // 已废弃
	| 'resolveDynamicImport'
	| 'resolveFileUrl'
	| 'resolveId'
	| 'resolveImportMeta';
load、resolveId、resolveDynamicImport 都是在 build 阶段触发的钩子函数、处理文件加载时候处理
renderDynamicImport、resolveFileUrl、resolveImportMeta、则是在输出阶段对输出内容的处理
SequentialPluginHooks
export type SequentialPluginHooks =
	| 'augmentChunkHash'
	| 'closeWatcher'
	| 'generateBundle'
	| 'options'
	| 'outputOptions'
	| 'renderChunk'
	| 'transform'
	| 'watchChange';
ParallelPluginHooks
export type ParallelPluginHooks =
	| 'banner'
	| 'buildEnd'
	| 'buildStart'
	| 'footer'
	| 'intro'
	| 'moduleParsed'
	| 'outro'
	| 'renderError'
	| 'renderStart'
	| 'writeBundle'
	| 'closeBundle';
后续
通过对插件钩子类型与插件钩子流程图的理解,大家也对插件钩子函数有大概的理解,实际上想要对每个钩子做到了如指掌还是比较困难的。笔者也只能看着官网的一堆英文发蒙。后面我们将会用实战的方式去运用这些钩子函数,只有我们想要利用插件去完成一件事情,才会去思考到在构建的哪个钩子可以做到,才会比较深入的了解钩子函数的作用。这样的思维训练次数多了,就知道每个钩子具体要做什么,这样 Rollup 插件的编写的也越得心应手,再也不是只会用,不懂原理的开发了。